Tags
bike rack, How-to, RV tech tips, RV Tips, RV travel, Summer Travel, tech tip
 Note: This article describes a do-it-yourself project requiring intermediate to advanced knowledge of metal fabrication. Alternately, you can employ the services of professionals.
Over the past several years, the fitness craze has gripped society. This includes many of us who enjoy the RV lifestyle. Although towed vehicles and toads are still employed by many owners, bicycle racks are becoming commonplace on many motorhomes and even trailers. My family and I have been hauling bikes on our RVs for many years, and I have long since sold my tow dolly in favor of a greener method of transportation.
When I owned large diesel-pusher motorhomes, mounting my bikes on the rack was never a problem. However, when I purchased my Class B van, I had to upgrade to a very expensive “Swing Daddy” rack in order to easily move the loaded bikes out of the way of the rear van doors. I now own an Itasca Navion Class C RV, and found that the rear-mounted spare tire was in the way of the bike rack. I was unable to even slide the rack into the hitch receiver because it hit the spare tire. In this article, I will describe the steps I undertook to relocate the spare tire out of the way of the rack. I am writing this article because I believe this may be a problem that others encounter, and modification is likely not that difficult.
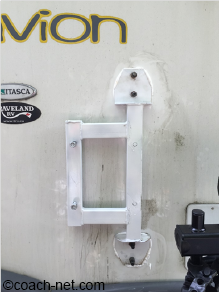
 The first step was to identify whether the rack could be moved. Fortunately, there were no obstacles blocking the tire rack from being moved towards the driver side, but moving the tire rack too far could cause a few problems. First, it would add extra rotational force (torsion) to the spare tire mounting bolts. Also, the tire could interfere with the lights and plastic trim near the bottom edge of the RV. Upon inspection of the bolts, I realized they are of sufficient size and grade to handle torsional forces with no problem. I decided that relocating the tire rack eight inches to the left would move it out of the way of the bikes without causing interference on the other side.
Since moving the mounting bolts was not feasible, I determined that modifying the rack itself would be required. I opted to alter my rack by welding, but if you are undertaking a similar project and have no welding experience, you may choose to use nuts and bolts instead. Instead of simply removing and relocating the center tube of the rack, which would result in having to keep strict track of the distance between the mounting flanges, I decided to add a new mounting tube. I used tube of the same size as the original piece, and simply offset a new mounting tube eight inches offset as shown. I cut off the original tire mounting bolts and welded new ones into the new tube. I also added a top cap to prevent the inside of the tube from rusting due to water running down the inside of the tube.
 After a few coats of paint, I mounted the new rack and checked the clearances. I found that the altered tire rack fit with the bicycle rack and bikes perfectly. I am now able to raise and lower the bike rack cradle and mount four bikes without difficulty.
If you find that you have an interference problem with your bike rack and rear-mounted spare tire, you may want to investigate simply moving or altering your rack as I did. Although welding requires some experience, cutting and bolting metal together is quite easy.
About the Author:
Steve Froese, an avid RV owner, traveler, and Coach-Net member since 2013, is the principal of “A Word to the Wise Technical Communications”, a published RV author, certified RV technician, and licensed Professional Engineer. He frequently collaborates with the “RV Doctor”, Gary Bunzer, and has worked with the RVIA/RVDA as a technical and training writer and consultant. Professionally, he works as a quality engineer and musician. Watch for more of Steve’s work in upcoming Coach-Net publications.

Pam B. TN~ “My experience was very positive. It’s very uncomfortable to be stranded and I certainly was glad I had your card close by. Thank You.”

